사용방법은 README.txt 파일에서 찾을 수 있다.
When the application starts, the serial connection is with the SCI module which is owned by CPU1.
Only commands designated for CPU1 are acceptable at this point before booting CPU2. If a CPU2 command is selected, the application asks the user for a different option. After booting to CPU2, either with "Run CPU1 Boot CPU2" or "Reset CPU1 Boot CPU2," CPU1 relinquishes the SCI module and Flash pump to CPU2. Therefore, the host application then prohibits any CPU1 commands to be selected and only allows communication with CPU2 from that point forward.
For CPU1-CM usage, when the application starts, the serial connection is with the SCI module which is owned by CPU1. Only commands designated for CPU1 are acceptable at this point before loading the CM kernel. If a CM command is selected, the application asks the user for a different option. After loading the CM kernel, either with "Run CPU1 Load CM" or "Reset CPU1 Load CM," CPU1 relinquishes the Flash pump to CM and uses the SCI module for CM when requested by CM. Therefore, the host application then prohibits any CPU1 commands to be selected and only allows communication with CM from that point forward.
이전글 참조 :
CPU2, CM쪽 User App을 다운로드 하려면 먼저 CPU1 Kernel을 올리고, 그 다음 CPU2 또는 CM Kernel을 올리는 과정이 필요하다.
먼저 CPU2 App 다운로드 테스트를 위해 CPU1-CPU2 연동을 위한 CPU1쪽 커널파일과 CPU2쪽 커널파일이 필요하고, CPU1에 다운받을 application 파일, CPU2에 다운받을 application 파일이 필요하다.
다운받을 application 파일은 cpu1-cpu2 dual led blinky 예제를 플래시 빌드해 사용했다.
input file을 만들 때 hex utility 옵션은 다음과 같이 하라고 되어있다. cpu1, cpu2는 이전글에서 한 방식대로 txt 파일을 만들면 된다.
To convert
a .out file compiled by Code Composer Studio into the required format, use the
hex2000 tool, which is part of the C2000 Code Generation Tools package:

	hex2000 -boot -a -sci8 <.out filename> -o <output filename>

For F2838x CM kernel and application files, the following command can be used

	armhex -boot -a -gpio8 <.out filename> -o <output filename>
serial_flash_programmer 폴더에서 커맨드창을 열고 아래 명령어를 입력한다.
serial_flash_programmer.exe
	-d f2838x
    -k flash_kernel_c28x_dual_ex1_c28x1.txt
    -a led_ex1_c28x_dual_blinky_cpu1.txt
    -m flash_kernel_c28x_dual_ex1_c28x2.txt
    -n led_ex1_c28x_dual_blinky_cpu2.txt
    -p COM6
    -b 9600
명령어와 옵션을 구분해 보면 다음과 같다.
serial_flash_programmer.exe
-d f2838x
-k flash_kernel_c28x_dual_ex1_c28x1.txt
-a led_ex1_c28x_dual_blinky_cpu1.txt
-m flash_kernel_c28x_dual_ex1_c28x2.txt
-n led_ex1_c28x_dual_blinky_cpu2.txt
-p COM6
-b 9600
CPU1 커널이 램에 올라가길 한참 기다리면 아래와 같은 메뉴가 나온다.
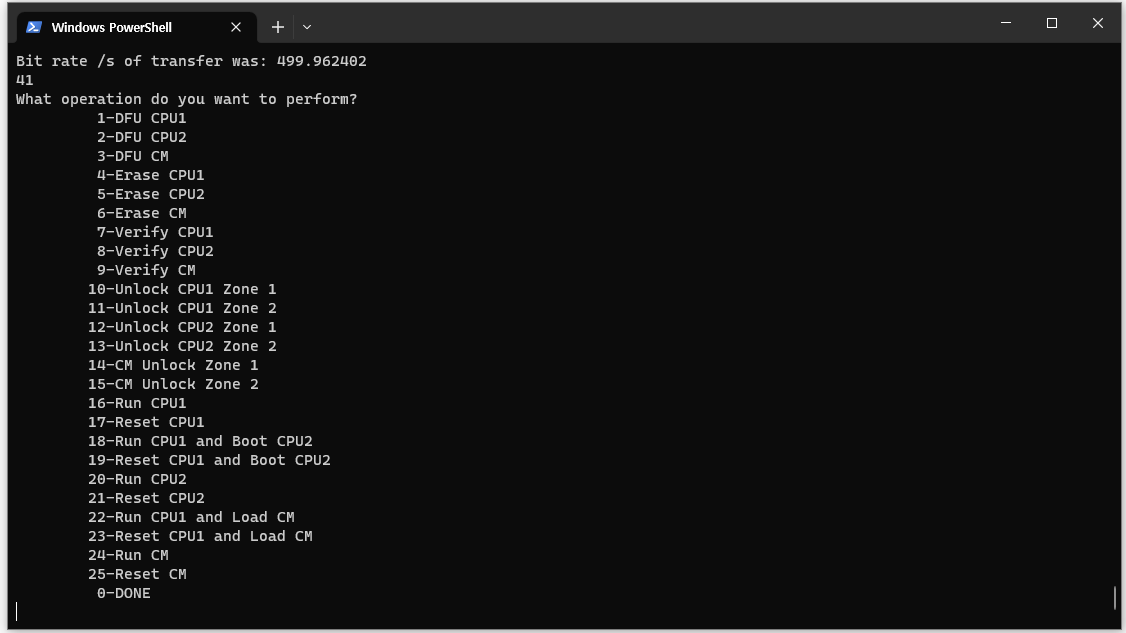
만약 CPU1도 다운로드 할거면, '1-DFU CPU1'을 선택해서 먼저 CPU1쪽 application 부터 다운로드한다.
그 다음 바로 '2-DFU CPU2'을 선택하면 아래와 같은 에러가 뜬다.

먼저 'Run CPU1 and Boot CPU2' 또는 'Reset CPU1 and Boot CPU2'를 선택하면 되는데 '19-Reset CPU1 and Boot CPU2'를 선택한다. 어차피 코드를 보면 둘 다 CPU1은 먼저 CPU2가 플래시를 제어할 수 있게 flash pump semaphore를 포기하고 CPU2 kernel이 작업이 다 끝났다는 시그널을 주기 전까진 hang 상태로 있으면서 IPC기능만 수행하기 때문에 그냥 'Reset CPU1 and Boot CPU2'를 선택해줬다.
아무튼 19번을 선택하면 CPU2 Kernel을 램에 복사해 실행하는데 또 여기서 한참을 기다려야한다.
그리고 '2-DFU CPU2'를 선택해 CPU2 application 코드를 다운로드 한다.

이제 bootmode를 SCI/Wait boot 에서 flash boot로 바꾼뒤 리셋 했을 때,
LED1, LED2가 각각 CPU1과 CPU2에 의해 blink 하는 것을 확인하였다.
그리고 CM쪽도 테스트를 해봤는데 처음엔 커널 복사 도중 멈추는 문제가 있었으나 새로 나온 C2000Ware_5_01_00_00에 들어있는 serial programmer를 사용했을 때 잘 다운로드 되는 걸 확인하였다. 아마 오류가 있어서 코드가 좀 수정된 것 같다.
CM쪽 flash kernel과 app의 출력물을 만들 때는 아래 커맨드를 통해 만들고 serial_flash_programmer.exe 실행시 CM kernel과 app 파일명 앞에 붙는 플래그만 바꿔주면 되지 다른 절차는 동일하다.
- cm app 출력물 생성 명령
armhex -boot -a -gpio8 <.out filename> -o
- serial flash programmer 명령 예시
serial_flash_programmer.exe -d f2838x -k flash_kernel_c28x_cm_ex1_c28x1.txt -a led_ex1_c28x_cm_blinky_cpu1.txt -o flash_kernel_c28x_cm_ex1_cm.txt -r led_ex1_c28x_cm_blinky_cm.txt -p COM6 -b 9600
근데 또 led blinky 예제가 아니라 실제 사용하는 프로젝트 CM 파일을 다운로드 시도 할 때는 조금 전송하더니 아래와 같은 오류 코드가 뜨면서 다시 메뉴화면으로 넘어가는 문제가 있었다.
ERROR Status: PROGRAM_ERROR
ERROR Address: 0x200008
Flash API Error: Incorrect Data Buffer Length
Please refer to the Flash API documentation for further explanation of the error.
FMSTAT Register contents: 00
이 문제는 TI forum에서 해결방법을 찾아 링커 커맨드 파일에 모든 flash section에 ALIGN(16) 키워드를 넣어주는 것으로 해결했다.
참고글 :
😊 그리고 위의 예시에서는 baudrate 9600을 사용하고 있는데 SCI boot ROM과 Flash Kernel의 SCI는 auto baud detect 기능을 사용하기 때문에 속도를 더 높여도 된다. 테스트 해본 결과 38400까지는 정상작동 했다.
'임베디드 개발 > TMS320F2838x (C28x)' 카테고리의 다른 글
| TMS320F28388D ] 라이브러리 램에 복사해 실행 (0) | 2023.04.22 |
|---|---|
| TMS320F28388D ] Flash API 사용 (0) | 2023.04.20 |
| TMS320F28388D ] TI 제공 부트로더 & Flash programmer 툴 사용하기 (3) | 2023.04.18 |
| TMS320F28388D ] Ethernet_resetModule() 무한루프 문제 (0) | 2023.03.31 |
| TMS320F28388D ] CM코어에 lwIP 포팅 (0) | 2023.03.31 |

