원리
LCD(Liquid Crystal Display)는 액정표시장치로 스스로 발광하지 않기 때문에 후면에 백라이트가 있고, 전면에 있는 액정에 전기적 신호를 가해 빛을 통과시키거나 차단하는 방식으로 문자를 표시한다. 다양한 규격이 있는데 보통 아두이노와는 16×2 character LCD 를 주로 사용하고 기존의 LCD는 핀이 너무 많아 사용에 불편함이 있었기 때문에 아래 사진과 같은 I2C모듈이 뒤에 납땜된 형태로 판매된다.
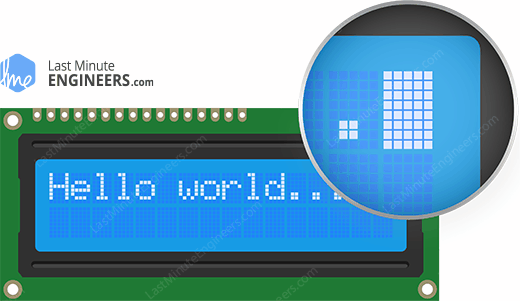
1행에 16문자 x 2행, 총 32문자를 표현할 수 있다.
1문자는 5x8의 픽셀 그리드에 의해 표현된다.
혹시 작동이 안된다면
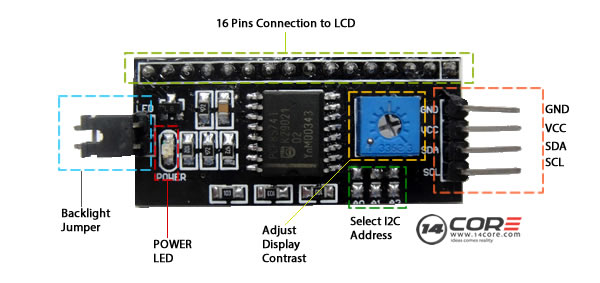
1. 왼쪽의 백라이트 점퍼가 잘 꼽혔는지 확인해보자. 저게 접지되어있어야 Backlight On이 된다.
2. 파란색 가변저항에 드라이버를 넣고 돌려서 문자의 선명도를 조절해본다.
준비
라이브러리 다운 받기
https://www.arduino.cc/reference/en/libraries/liquidcrystal-i2c/
LiquidCrystal I2C - Arduino Reference
Reference > Libraries > Liquidcrystal i2c LiquidCrystal I2C Display A library for I2C LCD displays. The library allows to control I2C displays with functions extremely similar to LiquidCrystal library. THIS LIBRARY MIGHT NOT BE COMPATIBLE WITH EXISTING SKE
www.arduino.cc
위 사이트에서 Liquidcrystal i2c 1.1.2 버전을 다운받을 수 있다.

아두이노 라이브러리 폴더 내에 zip파일 통째로 갖다 놓고 아두이노에서 스케치->라이브러리 포함하기->.ZIP 라이브러리 추가하기를 한다.
이후 헤더파일을 include해서 사용할 수 있다.
#include <LiquidCrystal_I2C.h>
회로
| 아두이노 우노 | |
| GND | GND |
| VCC | 5V |
| SDA | A4 |
| SCL | A5 |
이렇게 전원이 공급되면 백라이트가 켜진다.
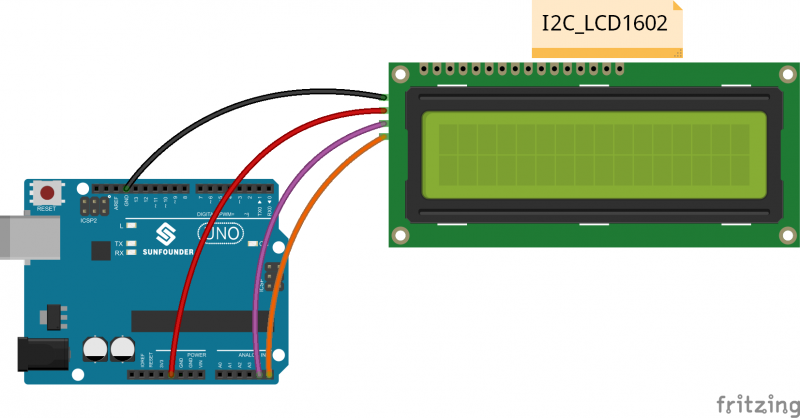
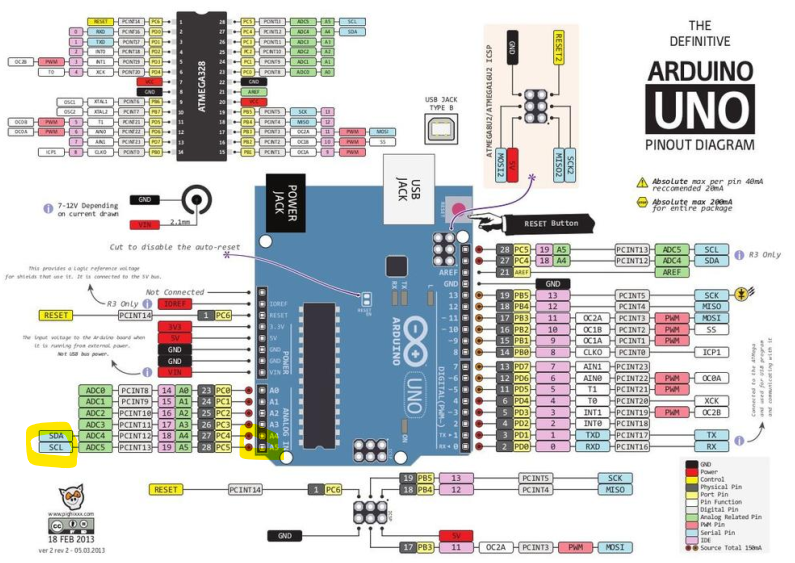
참고로 I2C (Inter Integrated Circuit) 통신은 두 개의 신호선(SDA, SCL)으로 여러 디바이스와 데이터를 송수신할 수 있는 저속통신 방식으로, 아두이노 우노에서는 SCL 핀은 A5, SDA 핀은 A4으로 정해져있다.
- SCL(Serial Clock) : 일정 주기의 클락신호를 보냄
- SDA(Serial Data): 클락신호에 따라 데이터를 보냄
코드
#include <LiquidCrystal_I2C.h>  // including header

LiquidCrystal_I2C lcd(0x27,16,2);  // set the LCD address to 0x3F for a 16 chars and 2 line display
// (주소값, 16x2 디스플레이)

void setup() {
  lcd.init(); // lcd 객체 초기화
  lcd.clear();  // 화면 지우고 커서를 왼쪽 상단 모서리로 옮김
  lcd.backlight();      // Make sure backlight is on	// 백라이트 on

  // Print a message on both lines of the LCD.
  lcd.setCursor(2,0);   //Set cursor to character 2 on line 0	// 커서 옮김. 0행에 2열
  lcd.print("Hello world!");	// 문자 출력

  lcd.setCursor(0,1);   //Move cursor to character 2 on line 1	// 커서 옮김. 1행에 0열
  lcd.print("HA! HA! HA!");
}

void loop() {
}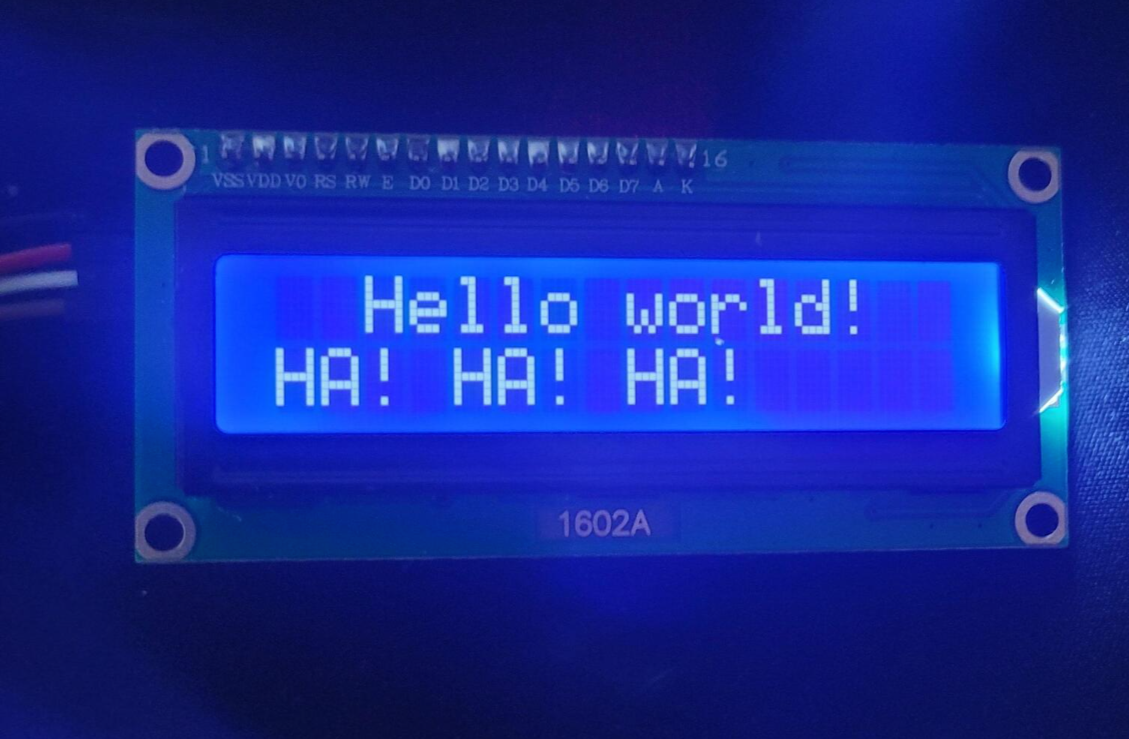
잘나온다.
만약 안나온다면
I2C통신으로 부품을 연결하고자 할 때 슬레이브의 주소값을 알아야하는데 그게 LCD 제조사마다 다를 수 있다. 보통은 0X27이나 0X3F 의 값을 갖는다.
아래코드를 통해 시리얼모니터로 주소값을 확인하고
//Written by Nick Gammon
#include <Wire.h>

void setup() {
  Serial.begin (9600);

  // Leonardo: wait for serial port to connect
  while (!Serial)
    {
    }

  Serial.println ();
  Serial.println ("I2C scanner. Scanning ...");
  byte count = 0;

  Wire.begin();
  for (byte i = 8; i < 120; i++)
  {
    Wire.beginTransmission (i);
    if (Wire.endTransmission () == 0)
      {
      Serial.print ("Found address: ");
      Serial.print (i, DEC);
      Serial.print (" (0x");
      Serial.print (i, HEX);
      Serial.println (")");
      count++;
      delay (1);  // maybe unneeded?
      } // end of good response
  } // end of for loop
  Serial.println ("Done.");
  Serial.print ("Found ");
  Serial.print (count, DEC);
  Serial.println (" device(s).");
}  // end of setup

void loop() {}
확인한 주소값을 위 Hello World 예제의 3번째 줄 첫번째 파라미터로 넣는다.

제공 함수들
- .begin();
- .setCursor(col,row);
- .backlight();
- .noBacklight();
- .print(val); - 문자(열) 출력
- .write(val); - 아스키코드값에 해당하는 문자 출력
- home() – positions the cursor in the top-left corner of the LCD without clearing the display. (화면 안지우고 커서를 왼쪽 상단 모서리로 옮김
- clear() - 화면지우고 커서를 왼쪽상단 모서리로 옮김
- cursor() – displays the LCD cursor, an underscore (line) at the position of the next character to be printed.
- noCursor() – hides the LCD cursor.
- blink() – creates a blinking block style LCD cursor: a blinking rectangle of 5×8 pixels at the position of the next character to be printed.
- noBlink() – disables the blinking block style LCD cursor.
- display() – turns on the LCD screen and displays the characters that were previously printed on the display.
- noDisplay() – turns off the LCD screen. Simply turning off the LCD screen does not clear data from the LCD memory. This means that it will be shown again when the display() function is called.
- scrollDisplayLeft() – scrolls the contents of the display one space to the left. If you want to scroll the text continuously, you need to use this function inside a loop. (문자 옆으로 흐르게 하기. 16자보다 큰 문자열을 표현할 수 있다)
- scrollDisplayRight() – scrolls the contents of the display one space to the right.
- autoscroll() – turns on automatic scrolling of the LCD. If the current text direction is left-to-right (default), the display scrolls to the left, if the current direction is right-to-left, the display scrolls to the right.
- noAutoscroll() – turns off automatic scrolling.
시리얼통신으로 입력받은 문자를 lcd화면 .clear()하며 출력하기
#include <LiquidCrystal_I2C.h>

LiquidCrystal_I2C lcd(0x27,16,2);  // set the LCD address to 0x3F for a 16 chars and 2 line display

void setup() {
  lcd.init();
  lcd.clear();
  lcd.backlight();      // Make sure backlight is on
  Serial.begin(9600);

}

void loop() {
  if (Serial.available()>0){    // 시리얼 버퍼에 데이터 수신이 있다면
    lcd.clear();

    while (Serial.available()>0){	// 버퍼가 비워질 때까지
        char val = Serial.read();	// 입력받은 문자를 변수에 저장하고
        lcd.print(val);   			// lcd에 출력
    }
  }
}
while문 바깥에 lcd.clear()가 없다면 커서가 문자출력후 다음칸에 위치하기 때문에 HelloWelcometomyblog 이런식으로 나오고 16자가 넘어가는 것은 짤릴 것이다.

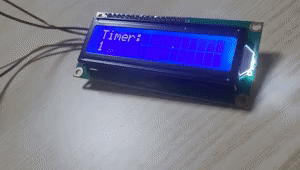
millis()함수 이용. 타이머 lcd에 출력하기
#include <LiquidCrystal_I2C.h>  // including header

LiquidCrystal_I2C lcd(0x27,16,2);  // set the LCD address to 0x3F for a 16 chars and 2 line display


void setup() {
  lcd.init();
  lcd.clear();
  lcd.backlight();

  lcd.setCursor(0, 0);
  lcd.print("Timer : ");

}

void loop() {

  lcd.setCursor(0, 1);
  lcd.print(millis()/1000);
}
millis() 함수 : 보드가 프로그램을 돌리기 시작한 후 지난 밀리 초를 unsigned long 타입으로 반환. 50일 정도가 지나면 오버플로우가 난다.
직접 5x8 픽셀의 커스텀 캐릭터 만들기 + 왼쪽으로 한칸 씩 글자 이동하기
#include <LiquidCrystal_I2C.h>  // including header

LiquidCrystal_I2C lcd(0x27,16,2);  // set the LCD address to 0x3F for a 16 chars and 2 line display

// make some custom characters:
byte heart[8] =
{
0b00000,
0b00000,
0b01010,
0b11111,
0b11111,
0b01110,
0b00100,
0b00000
};

byte h[8] =
{
0b00000,
0b01110,
0b11111,
0b00100,
0b01110,
0b10001,
0b01110,
0b00000
};

byte a[8] =
{
0b01000,
0b01000,
0b01000,
0b01110,
0b01110,
0b01000,
0b01000,
0b01000
};

byte t[8] =
{
0b11111,
0b00000,
0b11111,
0b10000,
0b10000,
0b11111,
0b00000,
0b11111
};

void setup() {
  lcd.init();
  lcd.clear();
  lcd.backlight();

// create a new characters
  lcd.createChar(0, heart);
  lcd.createChar(1, h);
  lcd.createChar(2, a);
  lcd.createChar(3, t);

  lcd.setCursor(0, 0);
  lcd.print("Custom Characters");

  lcd.setCursor(0, 1);
  lcd.write(0);
  lcd.setCursor(1, 1);
  lcd.write(1);
  lcd.setCursor(2, 1);
  lcd.write(2);
  lcd.setCursor(3, 1);
  lcd.write(3);

  lcd.setCursor(5, 1);
  lcd.write(0);
  lcd.setCursor(6, 1);
  lcd.write(1);
  lcd.setCursor(7, 1);
  lcd.write(2);
  lcd.setCursor(8, 1);
  lcd.write(3);

  lcd.setCursor(10, 1);
  lcd.write(0);
  lcd.setCursor(11, 1);
  lcd.write(1);
  lcd.setCursor(12, 1);
  lcd.write(2);
  lcd.setCursor(13, 1);
  lcd.write(3);
}

void loop() {

  lcd.scrollDisplayLeft();	// 왼쪽으로 한칸씩 이동
  delay(300);	// 0.3초마다
}
원래 한글은 출력이 안되는데 직접 5x8픽셀의 'ㅎ', 'ㅏ', '트' 모양을 커스텀으로 만들어 줬다.
근데 5x8픽셀이라 한계가 있다. 정렬이 안맞기도 하고 아마 종성이 있는 문자는 안될 것 같다.
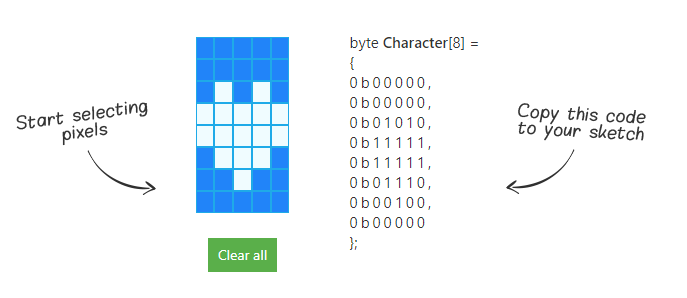
아래 사이트에서 커스텀으로 만들고자 하는 모양을 눈으로 확인한 후에 복붙하면 된다.
https://lastminuteengineers.com/i2c-lcd-arduino-tutorial/
'임베디드 개발 > 아두이노' 카테고리의 다른 글
| [ 아두이노 ] 풀업저항 , 풀다운저항 달아서 버튼 ( 스위치 )누르면 불켜지는 회로 구성하기 (0) | 2022.05.21 |
|---|---|
| NodeMCU 를 Arduino IDE에서 사용하기 위한 환경 설정 방법 (0) | 2022.05.04 |
| [ 아두이노 ] 초음파센서로 측정한 거리를 LCD 화면에 표시하기 (0) | 2022.05.02 |
| [ 아두이노 ] 초음파 거리 측정 센서 HC-SR04 (0) | 2022.04.25 |
| [ 아두이노 ] LED의 정격 전압과 전류 (1) | 2022.04.14 |


