영상 ▼

로봇의 티칭 방법
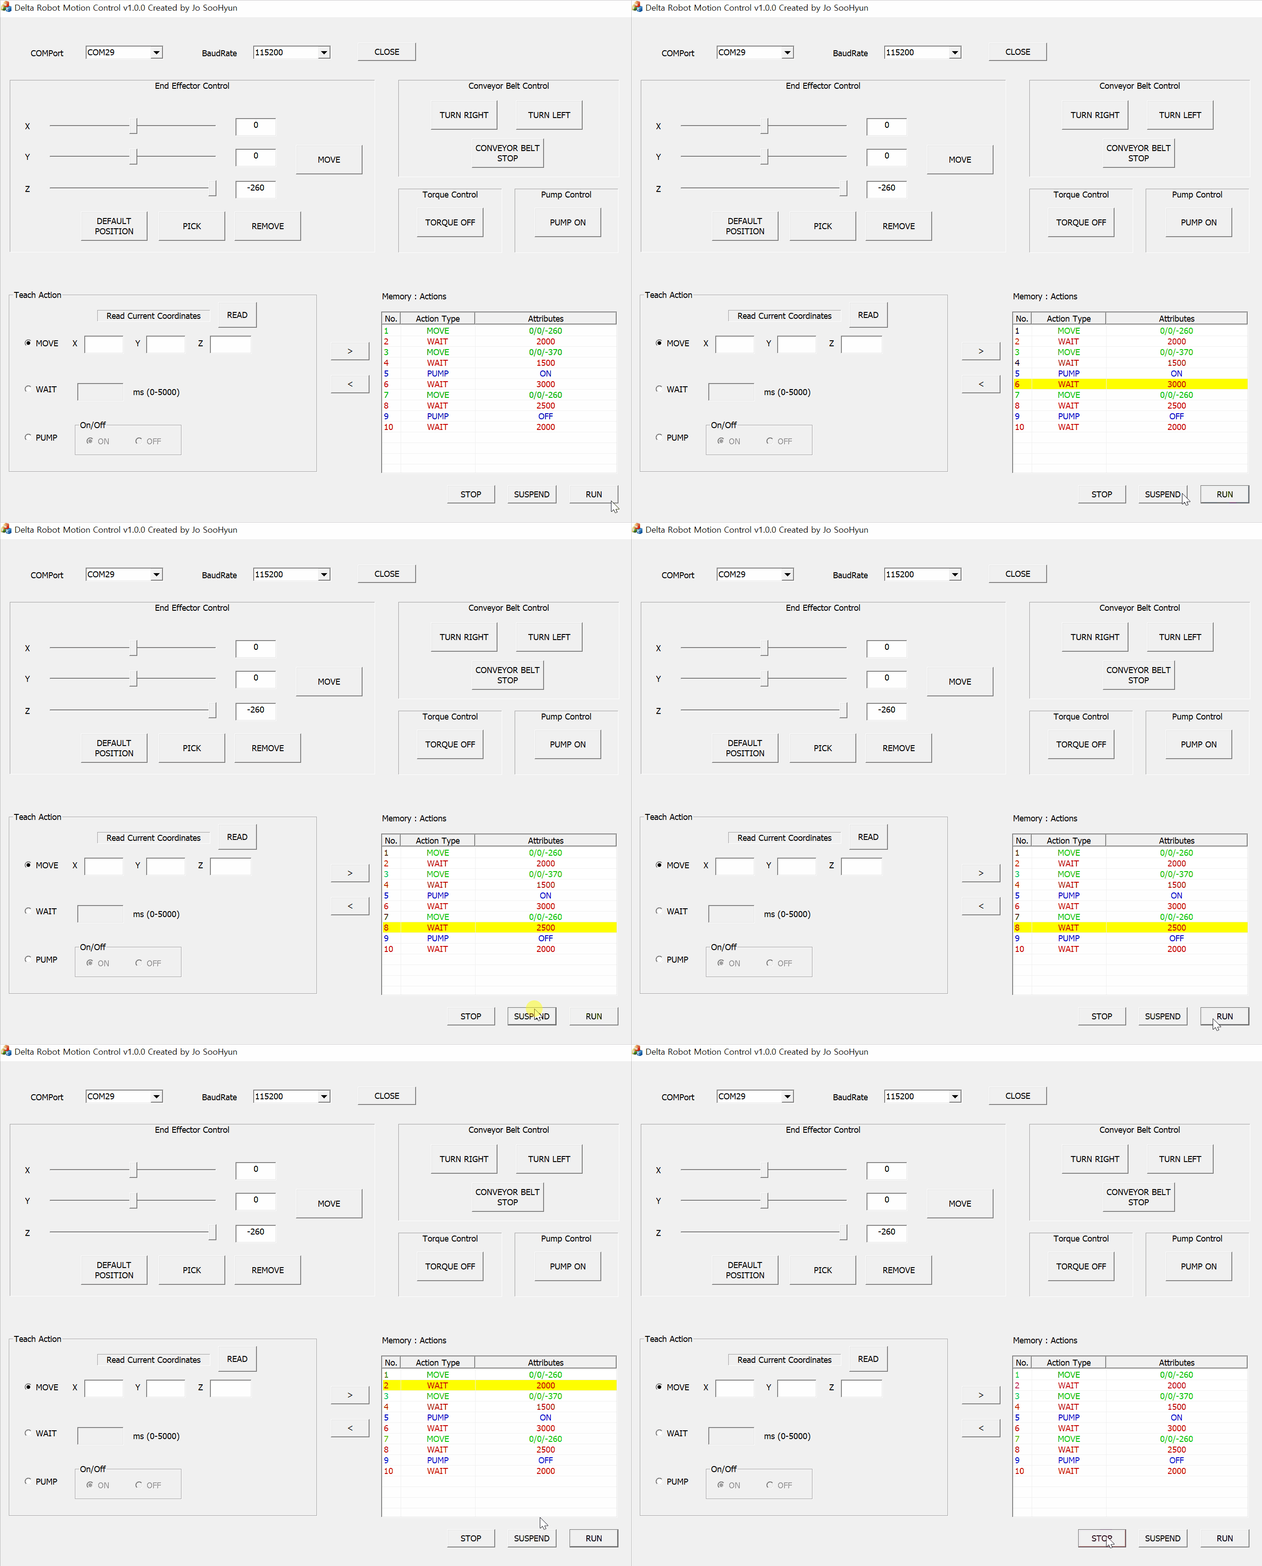
로봇에게 가르칠 수 있는 행동의 종류는 MOVE, WAIT, PUMP 세가지가 있고 각각 속성값을 지정할 수 있다.
1. MOVE : TORQUE OFF 버튼을 누른 뒤 사람 손으로 원하는 위치로 엔드 이펙터를 이동시킨 후에 READ 버튼을 클릭하면 현재 좌표값이 입력된다. 물론 좌표값을 직접 입력하는 것도 가능하다.
2. WAIT : 직전행동 후 대기시간을 설정한다. ms 단위로 0-5000 사이의 값을 입력할 수 있다.
3. PUMP : ON 또는 OFF를 선택한다.
원하는 행동의 라디오버튼을 클릭하고 속성값이 지정되었으면 ">" 버튼을 눌러 해당 행동을 기억시킬 수 있다. 기억된 행동은 순서대로 번호가 부여되며 중간에 행동을 끼워넣거나 "<" 버튼을 눌러 행동을 삭제하는 것도 가능하다.
">" 버튼 눌렀을 때의 이벤트 처리 함수
void CdeltaControlDlg::OnBnClickedButtonToRight()
{
	UpdateData(TRUE);
	int idx = m_list.GetSelectionMark();
	vector<DataRow*>::iterator iter;
	vector<DataRow*>& refList = DC.getList();

	if (idx == -1)
	{
		iter = refList.end();
	}
	else
	{
		iter = refList.begin() + idx + 1;
	}

	switch (m_radio) {
	case 0:
		if (m_readX == _T("") || m_readY == _T("") || m_readZ == _T(""))
		{
			AfxMessageBox(_T("Please input coordinates."));
		}
		else
		{
			refList.insert(iter, (new DataRow(_T("MOVE"), m_readX + _T("/") + m_readY + _T("/") + m_readZ)));
		}
		break;
	case 1:
		if (m_delay == _T(""))
		{
			AfxMessageBox(_T("Please input wait time."));
		}
		else if (_ttoi(m_delay) < 0 || _ttoi(m_delay) > 5000)
		{
			AfxMessageBox(_T("Please input time within the range."));
		}
		else
		{
			refList.insert(iter, (new DataRow(_T("WAIT"), m_delay)));
		}
		break;
	case 2:
		switch (m_radio2)
		{
		case 0:
			refList.insert(iter, (new DataRow(_T("PUMP"), _T("ON"))));
			break;
		case 1:
			refList.insert(iter, (new DataRow(_T("PUMP"), _T("OFF"))));
			break;
		default:
			break;
		}
	default:
		break;
	}

	renewListControl();
	UpdateData(FALSE);

}
코드가 너무 길어지는 것을 방지하고자 참조자와 iterator를 사용했다. 리스트 컨트롤에서 아무것도 클릭되지 않았을 때는 iterator 가 refList.end(); 를 가리키고 어떤 행이 클릭된 경우에는 refList.begin() + idx + 1; 를 가리킨다.
라디오 버튼 그룹의 int type 멤버 변수를 사용한 switch case 문을 통해 벡터에 액션 타입과 속성값을 문자열로 기억시킨다. 잘못 입력했을 때의 예외처리도 해줬다.
"<" 버튼 눌렀을 때의 이벤트 처리 함수
void CdeltaControlDlg::OnBnClickedButtonToLeft()
{
	int idx = m_list.GetSelectionMark();
	vector<DataRow*>::iterator iter;

	if (idx == -1) return;

	DC.getList().erase(DC.getList().begin() + idx);

	renewListControl();
	UpdateData(FALSE);
}
벡터에서 해당 데이터를 지우고 리스트 컨트롤을 갱신해 다시 그린다.
리스트 컨트롤 지우고 벡터 데이터로 다시 그리는 함수
void CdeltaControlDlg::renewListControl()
{
	m_list.DeleteAllItems();
	for (int i = 0; i < (int)DC.getList().size(); i++)
	{
		CString temp;
		temp.Format(_T("%d"), i + 1);
		m_list.InsertItem(i, temp);
		m_list.SetItem(i, 1, LVIF_TEXT, DC.getList().at(i)->getActionType(), NULL, NULL, NULL, NULL);
		m_list.SetItem(i, 2, LVIF_TEXT, DC.getList().at(i)->getAttributes(), NULL, NULL, NULL, NULL);

	}
}
파일입출력 기능을 사용한 티칭 데이터 관리

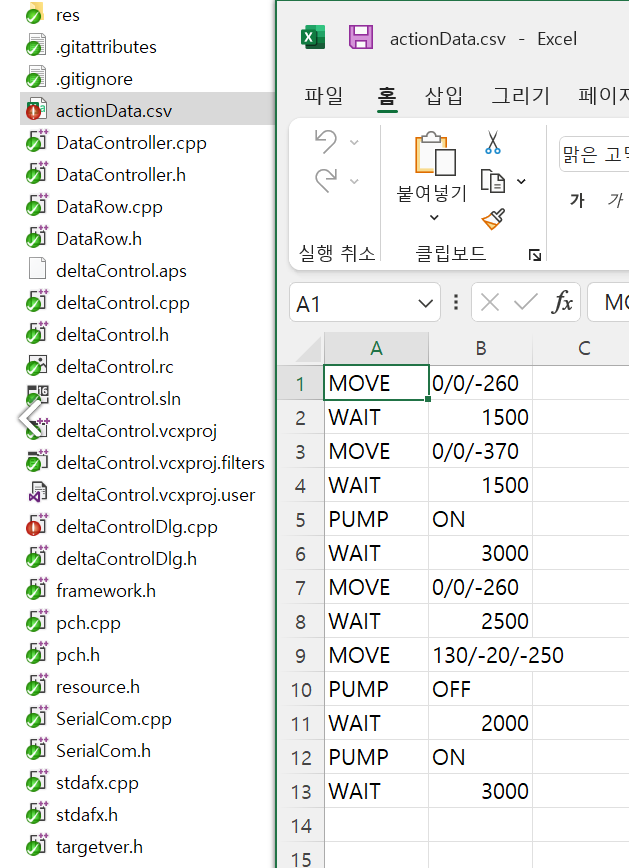
데이터 관리를 위해 DataRow 클래스와 DataController 클래스를 추가하였다.
DataRow.h
#pragma once
class DataRow
{
private:
	CString actionType;
	CString Attributes;

public:
	DataRow(CString _actionType, CString _Attributes);
	~DataRow();

	CString getActionType() const;
	void SetActionType(const CString& _actionType);
	CString getAttributes() const;
	void setAttributes(const CString& _Attributes);

};
DataRow.cpp
#include "pch.h"
#include "DataRow.h"

DataRow::DataRow(CString _actionType, CString _Attributes)
	:actionType(_actionType), Attributes(_Attributes)
{

}

DataRow::~DataRow()
{

}

CString DataRow::getActionType() const
{
	return actionType;
}

void DataRow::SetActionType(const CString& _actionType)
{
	this->actionType = _actionType;
}

CString DataRow::getAttributes() const
{
	return Attributes;
}

void DataRow::setAttributes(const CString& _Attributes)
{
	this->Attributes = _Attributes;
}
DataController.h
#pragma once

#include"DataRow.h"
#include <vector>
#include <string>

using namespace std;

class DataController
{

private:
	vector<DataRow*> list;

public:
	vector<DataRow*>& getList();
	void loadListFromCSVFile();
	void SaveListToFile();
	string MakeRowToOneStr(int i);
};
DataController.cpp
#include "pch.h"
#include "DataController.h"

#include <sstream>
#include <fstream>

#include <iostream>

#define COLUMN_NUM 2

void DataController::loadListFromCSVFile()
{
	ifstream data("actionData.csv");

	if (!data.is_open())
	{
		cerr << "file open error!" << endl;
		return;
	}

	string line;

	while (getline(data, line))
	{
		string comp;
		if (!line.compare("")) break;
		stringstream lineStream(line);

		string cell[COLUMN_NUM];

		int i = 0;

		for (int i = 0; i < COLUMN_NUM; i++)
		{
			getline(lineStream, cell[i], ',');
		}

		CString CCell[COLUMN_NUM];
		CCell[0] = cell[0].c_str();
		CCell[1] = cell[1].c_str();

		list.push_back(new DataRow(CCell[0], CCell[1]));

	}
}

vector<DataRow*>& DataController::getList()
{
	return this->list;
}

void DataController::SaveListToFile()
{

	ofstream myfile;

	myfile.open("actionData.csv");

	for (int i = 0; i < list.size() ; i++)
	{
		myfile << MakeRowToOneStr(i);
	}

	myfile.close();
}

string DataController::MakeRowToOneStr(int i)
{
	string temp;
	temp = list.at(i)->getActionType() + "," + list.at(i)->getAttributes() + "\n";

	return temp;
}
OnInitDialog() 함수에서 .csv 파일로 부터 데이터를 Load 한다. OnDestroy() 함수에서는 .csv 파일로 데이터를 Save 한다.
그리고 -Dlg.h 에는 DataController 객체를 멤버 변수로 포함시킨다.
public:
	DataController DC;
쓰레드를 활용한 반복작업 수행

쓰레드 객체의 포인터를 담아 둘 변수를 만들고 쓰레드의 상태를 나타내게 할 enum 타입 변수를 생성한다.
typedef enum {
	THREAD_STOP,
	THREAD_RUNNING,
	THREAD_PAUSE
}_ThreadStatus;

//...
public:
	CWinThread* m_pThread;
	_ThreadStatus m_threadStatus;
RUN 버튼 클릭시 쓰레드 생성 및 시작 또는 일시중단된 쓰레드 재개
void CdeltaControlDlg::OnBnClickedButtonRun()
{

	if (m_pThread == NULL)
	{

		m_pThread = AfxBeginThread(ThreadRepeat, (LPVOID)this);
		if (m_pThread == NULL)
		{
			AfxMessageBox(_T("ERROR : Fail to begin thread."));
		}
		else
		{
			m_pThread->m_bAutoDelete = FALSE;
			m_threadStatus = THREAD_RUNNING;
		}
	}
	else if (m_threadStatus == THREAD_PAUSE)
	{
		m_pThread->ResumeThread();
		m_threadStatus = THREAD_RUNNING;
	}

}
쓰레드 함수를 전역으로 만들었는데 다이얼로그 클래스에 접근 가능케 하기 위해 파라미터로 현재 다이얼로그의 포인터인 this를 넘긴다.
SUSPEND 버튼을 클릭 시 쓰레드 일시 중단
void CdeltaControlDlg::OnBnClickedButtonSuspend()
{
	if (m_pThread != NULL)
	{
		m_pThread->SuspendThread();
		m_threadStatus = THREAD_PAUSE;
	}

}
STOP 버튼 클릭 시 / 시리얼 통신 끊길 시 / 다이얼로그 종료 시에 쓰레드 종료
void CdeltaControlDlg::OnBnClickedButtonStop()
{
	terminateThread();
}

void CdeltaControlDlg::terminateThread()
{
	if (m_pThread != NULL)
	{
		pump(0);
		currentRow = -1;
		m_pThread->SuspendThread();
		DWORD dwResult;
		GetExitCodeThread(m_pThread->m_hThread, &dwResult);

		delete m_pThread;
		m_pThread = NULL;
		m_threadStatus = THREAD_STOP;
		renewListControl();
	}
}
pump(0)으로 꺼주고 현재 작업중이던 행을 뜻하는 멤버변수 currentRow는 -1로 바꾼다. 종료 후 리스트 컨트롤을 한번 갱신해준다.
쓰레드 전역 함수
UINT ThreadRepeat(LPVOID LpData)
{

	CdeltaControlDlg* pDlg = (CdeltaControlDlg*)(LpData);
	vector<DataRow*>& refList = pDlg->DC.getList();

	while (pDlg->m_threadStatus == THREAD_RUNNING)
	{
		for (int i = 0; i < refList.size(); i++)
		{
			pDlg->currentRow = i;
			pDlg->renewListControl();

			if (!refList.at(i)->getActionType().Compare(_T("MOVE")))
			{
				CString temp = refList.at(i)->getAttributes();
				CString strX, strY, strZ;
				AfxExtractSubString(strX, temp, 0, '/');
				AfxExtractSubString(strY, temp, 1, '/');
				AfxExtractSubString(strZ, temp, 2, '/');
				pDlg->move(_ttoi(strX),_ttoi(strY),_ttoi(strZ));
				Sleep(200);
			}
			else if (!refList.at(i)->getActionType().Compare(_T("WAIT")))
			{
				int time = _ttoi(refList.at(i)->getAttributes());
				pDlg->wait(time);
				Sleep(time);
			}
			else if (!refList.at(i)->getActionType().Compare(_T("PUMP")))
			{
				if (!refList.at(i)->getAttributes().Compare(_T("ON")))
				{
					pDlg->pump(1);
				}
				else if (!refList.at(i)->getAttributes().Compare(_T("OFF")))
				{
					pDlg->pump(0);
				}
				Sleep(200);
			}
		}
	}

	return 0;
}
파라미터로 넘어온 포인터를 사용해서 다이얼로그의 멤버변수와 함수에 접근할 수 있다. 쓰레드가 Running 상태인 동안은 계속 while문 안을 반복한다.
pDlg->currentRow = i; 는 현재 작업중인 행을 노란색으로 표시해 사용자가 직관적으로 알 수 있게끔 하기 위함이다.
참고로 쓰레드 안에서는 UpdateData(False)를 하면 오류가 난다.
리스트 컨트롤 색상을 행 단위로 실시간 변경하기 위해 만든 함수
void CdeltaControlDlg::OnCustomdrawMyList(NMHDR* pNMHDR, LRESULT* pResult)
{
	NMLVCUSTOMDRAW* pLVCD = reinterpret_cast<NMLVCUSTOMDRAW*>(pNMHDR);

	// Take the default processing unless we
	// set this to something else below.
	*pResult = CDRF_DODEFAULT;

	// First thing - check the draw stage. If it's the control's prepaint
	// stage, then tell Windows we want messages for every item.

	if (CDDS_PREPAINT == pLVCD->nmcd.dwDrawStage)
	{
		*pResult = CDRF_NOTIFYITEMDRAW;
	}
	else if (CDDS_ITEMPREPAINT == pLVCD->nmcd.dwDrawStage)
	{
			// This is the prepaint stage for an item. Here's where we set the
			// item's text color. Our return value will tell Windows to draw the
			// item itself, but it will use the new color we set here.
			// We'll cycle the colors through red, green, and light blue.

		COLORREF crText = RGB(0, 0, 0);
		COLORREF crBkgnd = RGB(255, 255, 255);


		if (m_list.GetItemText(pLVCD->nmcd.dwItemSpec, 1) == _T("WAIT"))
		{
			crText = RGB(200, 0, 0);
		}
		else if (m_list.GetItemText(pLVCD->nmcd.dwItemSpec, 1) == _T("MOVE"))
		{
			crText = RGB(0, 200, 0);
		}
		else if (m_list.GetItemText(pLVCD->nmcd.dwItemSpec, 1) == _T("PUMP"))
		{
			crText = RGB(0, 0, 200);
		}

		if (pLVCD->nmcd.dwItemSpec == currentRow)
		{
			crBkgnd = RGB(255, 255, 0);
		}

		// Store the color back in the NMLVCUSTOMDRAW struct.
		pLVCD->clrText = crText;
		pLVCD->clrTextBk = crBkgnd;

		// Tell Windows to paint the control itself.
		*pResult = CDRF_DODEFAULT;
	}
}
반복 작업을 위해 만든 함수들
void CdeltaControlDlg::pump(bool option)
{
	CString str = _T("DP");

	if (option)
	{
		str += _T("1");
	}
	else
	{
		str += _T("0");
	}

	str += _T("\n");
	m_comm->Send(str, str.GetLength());

}

void CdeltaControlDlg::wait(int time)
{
	CString str = _T("DW");

	CString temp;
	temp.Format(_T("%04d"), time);

	str += temp;
	str += _T("\n");

	m_comm->Send(str, str.GetLength());

}

void CdeltaControlDlg::move(int x, int y, int z)
{

	CString str = _T("DZ");
	CString temp;
	if (x >= 0) {
		str += _T("+");
	}
	else {
		str += _T("-");
	}
	temp.Format(_T("%03d"), abs(x));
	str += temp;
	if (y >= 0) {
		str += _T("+");
	}
	else {
		str += _T("-");
	}
	temp.Format(_T("%03d"), abs(y));
	str += temp;

	if (z >= 0) {
		str += _T("+");
	}
	else {
		str += _T("-");
	}
	temp.Format(_T("%03d"), abs(z));
	str += temp;

	str += _T("\n");

	m_comm->Send(str, str.GetLength());

}'임베디드 개발 > STM32 (ARM Cortex-M)' 카테고리의 다른 글
| STM32 ] UDP Server, lwIP Raw API (0) | 2022.09.25 |
|---|---|
| STM32 ] LwIP 사용 초기설정 후 핑테스트 (9) | 2022.09.24 |
| STM32 + MFC ] 델타 로봇, RTOS 구조 변경 + 슬라이더 컨트롤을 통한 좌표 이동 제어 (7) | 2022.09.14 |
| STM32 ] 델타로봇, UART로 Command Line Interface 구현 + 기판에 다시 납땜 (5) (0) | 2022.09.04 |
| STM32 ] 델타로봇과 MFC 연동 + 컨베이어 벨트 추가 (4) (0) | 2022.08.28 |


