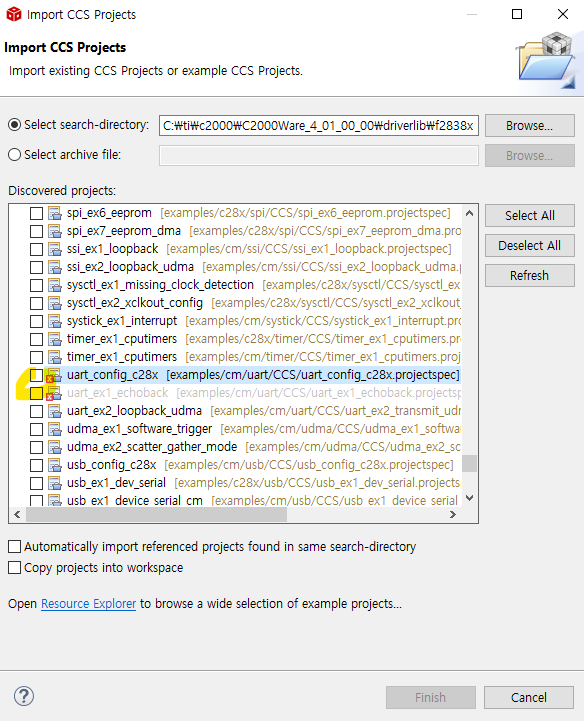
examples/cm 의 uart 예제를 찾아보면 CPU1(c28x) 코어가 uart config 하는 예제와 CM(ARM Cortex-M4) 코어가 uart echoback 을 수행하는 예제 두 개 가 보인다. 둘 다 import 한다.
첫 번째 예제는 CPU1이 CM의 UART 기능을 쓰기 위한 GPIO 핀 설정을 해주고 공유 주변장치를 할당해준다.
//
// Included Files
//
#include "driverlib.h"
#include "device.h"

void main(void)
{

    //
    // Initialize device clock and peripherals
    //
    Device_init();

    //
    // Boot CM core
    //
#ifdef _FLASH
    Device_bootCM(BOOTMODE_BOOT_TO_FLASH_SECTOR0);
#else
    Device_bootCM(BOOTMODE_BOOT_TO_S0RAM);
#endif

    //
    // Disable pin locks and enable internal pull-ups.
    //
    Device_initGPIO();

//...
#ifdef UART
    //
    // Configure GPIO85 as the UART Rx pin.
    //
    GPIO_setPinConfig(GPIO_85_UARTA_RX);
    GPIO_setDirectionMode(85, GPIO_DIR_MODE_IN);
    GPIO_setPadConfig(85, GPIO_PIN_TYPE_STD);
    GPIO_setQualificationMode(85, GPIO_QUAL_ASYNC);

    //
    // Configure GPIO84 as the UART Tx pin.
    //
    GPIO_setPinConfig(GPIO_84_UARTA_TX);
    GPIO_setDirectionMode(84, GPIO_DIR_MODE_OUT);
    GPIO_setPadConfig(84, GPIO_PIN_TYPE_STD);
    GPIO_setQualificationMode(84, GPIO_QUAL_ASYNC);
#endif
//...
}
두 번째 예제 프로젝트는 CM 코어가 UART 인터럽트 방식으로 수신된 데이터를 에코백하는 내용이다.
//
// Included Files
//
#include <stdint.h>
#include <stdbool.h>

#include "cm.h"

//
// Defines
//
#define NUM_UART_DATA    4

//
// Function Prototypes
//
__interrupt void UART_RX_IntHandler(void);

//
// Main
//
void main(void)
{

    //
    // disable WD, enable peripheral clocks.
    //
    CM_init();

    //
    // Configure UART0 for echoback.Set up to transfer data at 115200 baud.
    //
    UART_setConfig(UART0_BASE,UART_CLK_FREQ , 115200,(UART_CONFIG_WLEN_8 |
                   UART_CONFIG_STOP_ONE | UART_CONFIG_PAR_NONE));

    //
    // Put a character to show start of example.  This will display on the
    // terminal.
    //
    UART_writeChar(UART0_BASE, '!');

    //
    // Enable the UART0 interrupt on the processor (NVIC).
    //
    UART_registerInterrupt(INT_UART0,UART_RX_IntHandler);

    //
    // FIFO enable
    //
    UART_enableFIFO(UART0_BASE);

    //
    // FIFO interrupt levels are set to generate an interrupt
    // when the TX FIFO is less than or equal to 7/8 empty and the
    // RX FIFO is greater than or equal to 1/8 full.
    //
    UART_setFIFOLevel(UART0_BASE, UART_FIFO_TX1_8, UART_FIFO_RX1_8);

    //
    // FIFO receive interrupt configuration
    //
    UART_clearInterruptStatus(UART0_BASE,UART_INT_RX | UART_INT_RT);
    UART_enableInterrupt(UART0_BASE,UART_INT_RX);

    //
    // Loop forever echoing data through the UART.
    //
    while(1)
    {
    }
}


__interrupt void UART_RX_IntHandler(void)
{
    uint32_t ui32Status;

    //
    // Get the interrupt status.
    //
    ui32Status = UART_getInterruptStatus(UART0_BASE, UART_RAW_INT);

    //
    // Clear the asserted interrupts.
    //
    UART_clearInterruptStatus(UART0_BASE, ui32Status);

    //
    // Loop while there are characters in the receive FIFO.
    //
    while(UART_isDataAvailable(UART0_BASE))
    {
        //
        // Read the next character from the UART and write it back to the UART.
        //
        UART_writeCharNonBlocking(UART0_BASE,
                                  UART_readCharNonBlocking(UART0_BASE));
    }
}

//
// End of File
//
예제 둘 다 빌드해 놓고 첫번째 예제를 선택해 디버그 세션을 만든다.

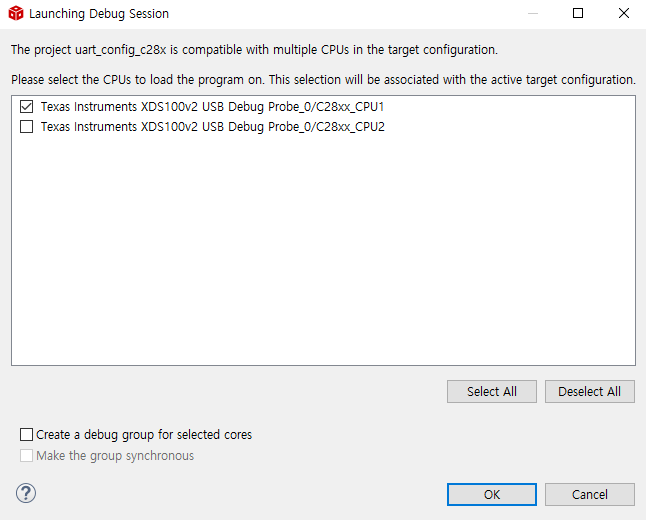
참고로 이렇게 하는 이유는 pin mux 세팅 권한은 CPU1만 가지며, 나머지 CPU와 CLA 는 읽기/쓰기 권한만 가지기 때문이다.
또한 다른 코어의 부트 권한도 CPU1이 가진다.


여기서
CLA (Control Law Accelaerator) 란?
메인 CPU와 병렬로 동작하는 32bit fp(부동소수점) math Accelerator 이다. CPU와 독립적으로 제어 알고리즘을 수행하여 시스템 대역폭을 대략 2배로 늘릴 수 있다.
Reference : https://vpam.tistory.com/109
그리고 Debug Configuration 에 들어간다.

아까 만들어진 디버그 세션을 선택하고 이름을 구분짓기 좋게 만들어준다.
사용되는 코어만 체크한 뒤 Apply를 누른다.
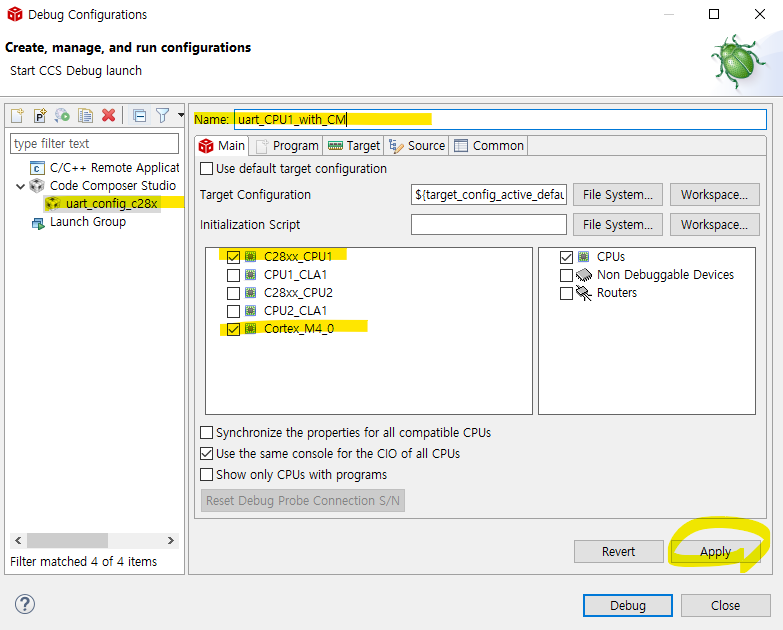
프로그램 탭으로 들어가 Device에 다른 코어를 지정하고 Project 옆의 Workspace...를 클릭해 해당 코어에서 실행될 프로젝트를 선택한다. Apply 를 누르고 Debug를 시작한다.

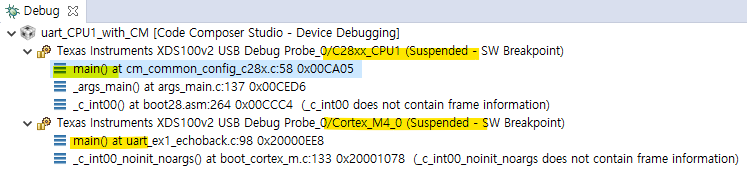
Debug Perspective 로 보면 두 코어 다 실행파일이 로드되어 main() 에서 대기중인 것을 확인할 수 있다.
F8을 눌러 각각 resume 한다.
핀설정을 확인해 TX, RX 연결하고 터미널을 열면 에코백 되는 것을 확인할 수 있다.
'임베디드 개발 > TMS320F2838x (C28x)' 카테고리의 다른 글
| TMS320F28388D ] 멀티 코어 사용하기 (0) | 2022.09.16 |
|---|---|
| TI ] CCS 에서 다른 Compiler 버전 사용하기 (0) | 2022.09.16 |
| TMS320F28388D ] ADC (ePWM 타이머를 사용한 Interrupt 방식) (0) | 2022.09.13 |
| TI ] SysConfig 와 CCS 의 유용한 기능 (0) | 2022.09.12 |
| TMS320F28388D ] Watch Expressions (Continuous Refresh) (0) | 2022.09.10 |


